By THLady Meala Caimbeul, Caid Cut & Thrust Marshal
Those that know me know that a Cut & Thrust fight is just about my most favorite thing to do with a sword. In a blatant attempt to get to do it more often, allow me to encapsulate what this art is, is not, and how you can get started.
By the book, Cut & Thrust is a type of rapier combat that incorporates percussive cutting and removes the push and pull (draw) cuts. It requires a little more armor to protect against these cuts, and does require a year of authorized rapier or unarmored experience, but those are not hard to accomplish. In standard rapier, to deliver a cut you must place and draw the edge along the target; this takes more time than driving a cut by turning the wrist. Cut & Thrust allows for single-time cuts, (as they are described in fighting manuals of the period) which are faster and more defensively sound.
These cuts do land with percussion, but do not have to be of a higher calibration than any standard heavy rapier blow. That is, you don’t have to hit hard. It is the percussion that makes these cuts seem harder. Trust me, you need no extra force to deliver a valid percussive cut; the sword wants to make this action, you just have to direct it.
Not all Heavy Rapiers are designed to deliver these cuts. The schlager-style blades, with almost no taper from shoulder to tip, are not permitted in Cut & Thrust. (This taper helps prevent the blade from breaking in cutting situations.) Yes, there are heavier blades for Cut & Thrust only, but you don’t need them to play. Most Heavy Rapiers that we use are perfectly suitable for Cut & Thrust.
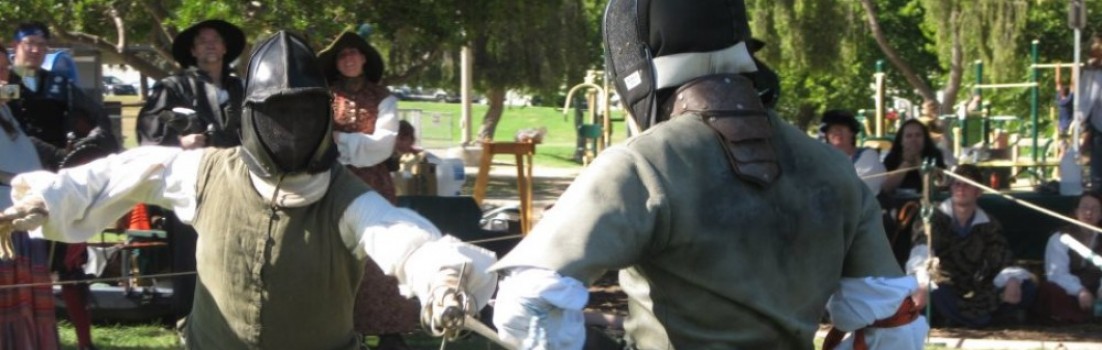
There is also some additional required armor (and some that we recommend.) All of which can be purchased commercially; SPES makes a great back-of-the-head insert, and there are many options for elbow pads. I carry an extra set of elbows and a spare back-of-the-head insert in my kit; if you want to practice Cut & Thrust, I’m happy to provide the armor. (Also, you don’t need the armor to practice cuts on a pell, or participate in drills or other controlled and directed practice.) We also recommend heavier than standard gloves, especially when using the more open weapons that don’t cover the fingers or wrist.
And now the thing that makes Cut & Thrust different from Heavy Rapier – Percussive Cutting. This can seem very intimidating; it often looks like we are wheeling swords at one another and should be leaving bruises and welts with every landed blow. But as I said above, you don’t need to hit harder for a valid blow. You do need to land a “controlled, well-intentioned blow, delivered with the striking edge of the sword with proper mechanics so to have been able to cleave the target.” These cuts are the result of circular motion, and are led with the hand (instead of the point.) While tip cuts are perfectly valid, most Cut & Thrust blows are delivered a little farther down toward the middle of the weapon.
When I teach cutting, I often use the example of cutting firewood with an axe. The arching motion, and the way one sends the weapon away from the body are some of the keys to good cutting technique. Least you think you must wind your sword to the top of your head to make a good cut, starting the arc at the shoulder; it is just as valid to cut from the wrist, transcribing a much smaller arc, and making a much faster attack.
Think of your average rapier play, your opponent is pointing a sword at you and initiates a lunge. You move your hand and dissuade the oncoming point, but now your point is off-line so you don’t have a ready thrust. To deliver a draw cut you’ll have to get closer, place the edge on the target, then pull or push the edge to finish the cut. In a Cut & Thrust bout, you are allowed to take that off-line point and, by turning the wrist, deliver a cut that will land much sooner that the draw, it will also be delivered at an angle that will keep you safer than the lateral draw cut.
The advantage of these cuts is first that you are defended by the nature of blade position and movement. Second, since you don’t have to place the blade first, they are faster than draw cuts. Icing on the cake is that these cuts are the ones described in pre-1650 fighting manuals, being able to perform them in the time described can allow for more historically-based combat
(Knowledge of historic rapier is not required for Cut & Thrust.)
One of the hurdles most fencers encounter when learning to cut is the tendency to “gather in” when they cut. Good cuts are made on an arc that extends out from the body and (usually) through a guard most masters call Long Point. When one is accustomed to draw cuts, the habit is there to pull your hand in, toward your body in an attempt to absorb some of the kinetic energy. While the instinct to not hurt your opponent is a good one, collapsing your guard in this way is more likely to result in a sloppy and invalid cut, and you being undefended while in range of your opponent.
The other way newer cutters attempt to compensate for the perceived excessive force is by ceasing to control the cut around the apex. When a thrust is about to land hard, many of us train to loosen our grip and stop pushing in order to take some of the power away from the attack. Applying that same technique to cutting can result in a sloppy blow that lands hard, but is not, in reality, a good cut. The key to a good cut is control, from when it is initiated all the way through to contact. By keeping control of the weapon, and guiding it all the way through the cut, you will be able to better control the force you send into your opponent.
If you want more information, and some practical experience, I invite you to attend the Cut & Thrust workshop offered at Colligium Caidus at 11:00 am on Sunday, May 17th. (http://www.collegiumcaidis.org/2015/schedule.html)